
Kristan leads the sales and marketing strategy at The Rack Sack, driving growth and market leadership. She focuses on aligning customer needs with business objectives, building strong partnerships, and positioning the company for sustained success.

Under-sink clutter is a universal kitchen frustration. An efficient trash can system shouldn’t just hold waste; it should save space and keep your kitchen looking seamless. The Rack Sack is a brilliant solution, but are you getting the most out of it?
This step-by-step guide walks you through the essential installation requirements, bag-sizing tips, and maintenance tricks to ensure your cabinet remains organized and mess-free.
Setting up your new Rack Sack in-cupboard trash can system is straightforward and usually takes less than 15 minutes. All you need is a standard screwdriver to navigate the 5 simple setup stages: measuring, marking your drill points, attaching the backer plate, hooking the frame, and testing the swing.
Before you twist the first screw, make sure you check these crucial pre-installation requirements:
To keep your trash can system running smoothly, using the correct bags makes a massive difference.
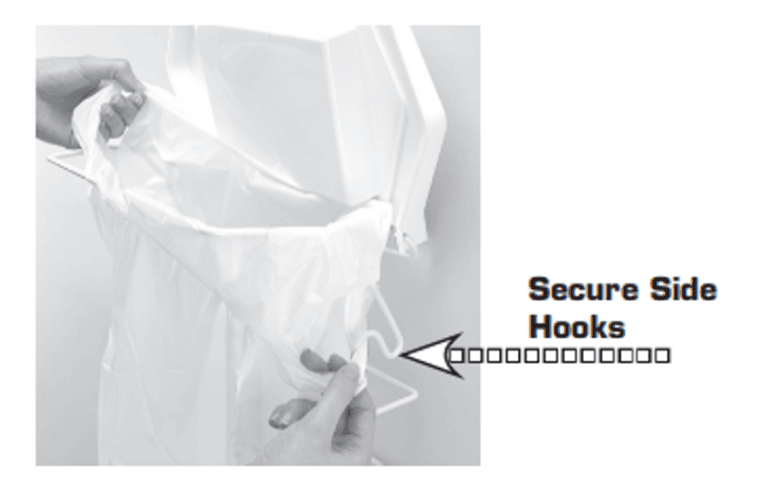
Standard small garbage bags often lead to messes. Trademarked Rack Sack bags are engineered with heavy-duty custom handles. These handles hook perfectly onto the side notches of the wire frame, which prevents the bag from slipping, sagging, or leaking under weight.
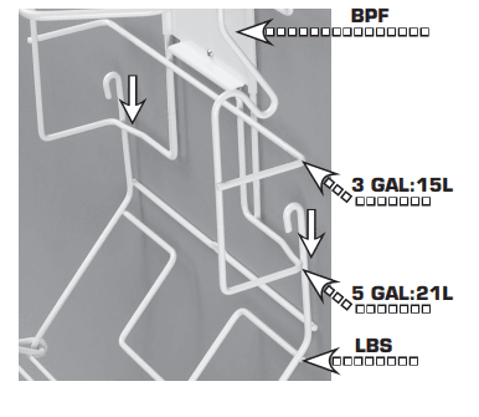
If you bought official refills and they seem too small to stretch across the frame, don’t worry! Your frame just needs a quick adjustment. Modern Rack Sack units feature an adjustable Lower Bag Support (LBS) bar to accommodate two different sizes:
Versatility Tip: While these bags are optimized to hang perfectly on the wire frame, their leak-proof, handled design means you can easily use them as high-quality liners for standard 15L or 21L freestanding office and bathroom waste bins as well.
Even a reliable trash can system requires a little maintenance over time to keep it operating smoothly.
If your lid keeps falling shut while you are trying to scrape plates or prep vegetables, you can fix it in seconds using a common household tool:
This simple tweak creates just enough tension against the lid mechanism to keep it securely propped open during use.

Because the frame has a shallow profile, it won’t trap old odors the way traditional plastic bins do. To keep it pristine, simply wipe down the wire frame and the lid with a damp cloth and mild dish soap once a week to eliminate any accidental splatters.
A well-maintained trash can system keeps your waste hidden and your floor space clear. By taking a few moments to adjust the frame for your preferred bag size and utilizing the quick pliers tweak for the lid, your Rack Sack will provide years of seamless, reliable kitchen organization.
WCAG 2.2 Commitment: We strictly adhere to WCAG 2.2 AA guidelines.
Personalized UI: Users with disabilities can personalize the interface.
AI-Based Compliance: We use AI to maintain accessibility during updates.
ARIA Attributes: Meaningful data for screen-readers using ARIA attributes.
Optimized Screen Reader and Keyboard Navigation:
Screen-reader Optimization: ARIA attributes for meaningful data.
Image Description: Auto image descriptions for better understanding.
OCR Technology: Text extraction from images.
Keyboard Navigation: Enhanced keyboard operability.
Content-skip Menus: Easy navigation with shortcuts.
Popup Handling: Improved handling of popups.
Shortcuts: Quick access to key elements with shortcuts.
Specialized Profiles for Disabilities:
Epilepsy Safe Profile: Safe browsing with reduced triggers.
Vision Impaired Profile: Enhanced interface for visual impairments.
Cognitive Disability Profile: Assistive features for cognitive disabilities.
ADHD-Friendly Profile: Minimized distractions for ADHD users.
Blind Users Profile: Compatibility with popular screen-readers.
Keyboard Navigation Profile: Navigate with keyboard commands.
Customizable User Interface Adjustments:
Font Adjustments: Customize font settings for readability.
Colour Adjustments: Choose contrast profiles and color schemes.
Animations Disable animations for user safety.
Content Highlighting: Emphasize key elements.
Audio Muting: Instantly mute the website.
Cognitive Disorders: Linked search engine for better understanding.
Additional Functions: Various customizable options.
Browser and Assistive Technology Support:
Supported Browsers: Google Chrome, Mozilla Firefox, Apple Safari, Opera, Microsoft Edge.
Supported Screen Readers: JAWS (Windows/MAC), NVDA (Windows/MAC).
Continual Accessibility Improvement:
Ongoing Efforts: We continuously enhance accessibility.
Goal: Achieve maximum accessibility with evolving technology.
Contact Us: Reach out via the website’s contact form for queries or concerns.
Content Settings
Browsing Settings